
Integration Overview
This integration allows customers to pay using Tabby by scanning a QR code displayed on the POS terminal. The flow involves:- Creating a payment session
- Displaying QR code on POS screen
- Customer scans QR code and completes payment
- Merchant receives payment confirmation
Quick Reference
Steps to Integrate Tabby with your POS
1
2
3
4
5
6
7
8
Integration Flow
Create Session and Payment Using Checkout API
Call the Create a session API. The required payload parameters for the POS session:Eligibility Check
As a response you receive one of the two session statuses -“created” or “rejected”:
- if the session status is
“created”- save the id of the session (will be required for cancellation step) and payment.id (will be required for payment status check and refund steps) received in the response:
- if the session status is
“rejected”- show the Payment failure screen and offer the customer an alternative payment method. Please, do not proceed with any further steps with Tabby. The rejection might be related to order amount being too high, disabled branch code, or other reasons. The response payload will contain the following:
Show QR Code
When the session has status“created” you will receive two links in the response. Use either of them to show the QR Code on the POS screen:
Using the Ready-Made QR Image
Theqr_code link points to the GET /api/v2/checkout/{id of session}/hpp_link_qr endpoint, which responds with a black-and-white PNG image (Content-Type: image/png, 200×200 px, under 1 KB):
- Use the link exactly as returned in the session response — do not construct or modify it manually, all required query parameters are already included.
- The request requires no authentication headers, so the POS application can fetch the image directly, without proxying it through your backend.
- Render the PNG in a native image component (for example, an
ImageViewon Android-based POS terminals) — no WebView or browser is needed.
QR Code Display Recommendations
- Size. Display the QR code at least 3×3 cm on the physical screen. When upscaling the 200×200 px image, use integer scale factors with nearest-neighbor (non-smoothing) scaling so the QR modules stay sharp. If your framework only supports smooth scaling, generate your own QR code from
web_urlat the native resolution instead. - One code per payment. The QR code is unique for each payment session. Never cache or reuse the image between payments — fetch a fresh one for every new session.
- Fallback. If the image fails to load (for example, due to a network error), create a new payment session and show the QR code from the
qr_codelink of the new response.
Payment Processing
Once QR Code is shown, check the payment status using the Retrieve Payment API call. We recommend calling the Retrieve API every 5 seconds until a terminal status is received. Alternatively, you can add a “Check status” button on the POS terminal to manually check this. The following statuses can be received:CREATED- the payment has not been completed yet, wait for it to change to one of the terminal statuses.AUTHORIZEDorCLOSED- the payment is successful, mark order as successful, print a receipt.REJECTEDorEXPIRED- the payment is not successful. Ask the customer to pay with a different payment method.
Cancel a Payment
A request to cancel a payment is available in the Postman collection. You can cancel a payment in two cases:- The cashier presses the “Cancel” button on the POS.
- Automatically, after a timeout. The recommended period is 300 seconds, but the timeout should never be less than 180 seconds.
CREATED. Once canceled - the status will change to EXPIRED.
If the payment has already been successful, attempting to cancel it will return the following error: 400 Bad Request
AUTHORIZED or CLOSED. Then show a success screen, print a receipt and proceed with the order.
The Cancel API does not refund payments and can only be used to expire not finalised sessions. Once the payment receives one of the terminal statuses -
AUTHORIZED, CLOSED, REJECTED or EXPIRED - the session cannot be cancelled.Refund a Payment
You can process a Full or Partial Refund. Call Refund API for a specific payment.id with the desired amount. You can find thepayment.id by matched payment.order.reference_id in your OMS.
You can also process a refund from the Tabby Merchant Dashboard.
Only payment in status
On Merchant Dashboard such payment will have status
CLOSED with a captured amount present in the “captures”:[] array of objects can be refunded.On Merchant Dashboard such payment will have status
CAPTURED.Print a Receipt
Show a success screen and print a receipt. The receipt data can be used to identify the order and payment, and (optionally) initiate a refund if your POS system provides this functionality.Recommended Designs
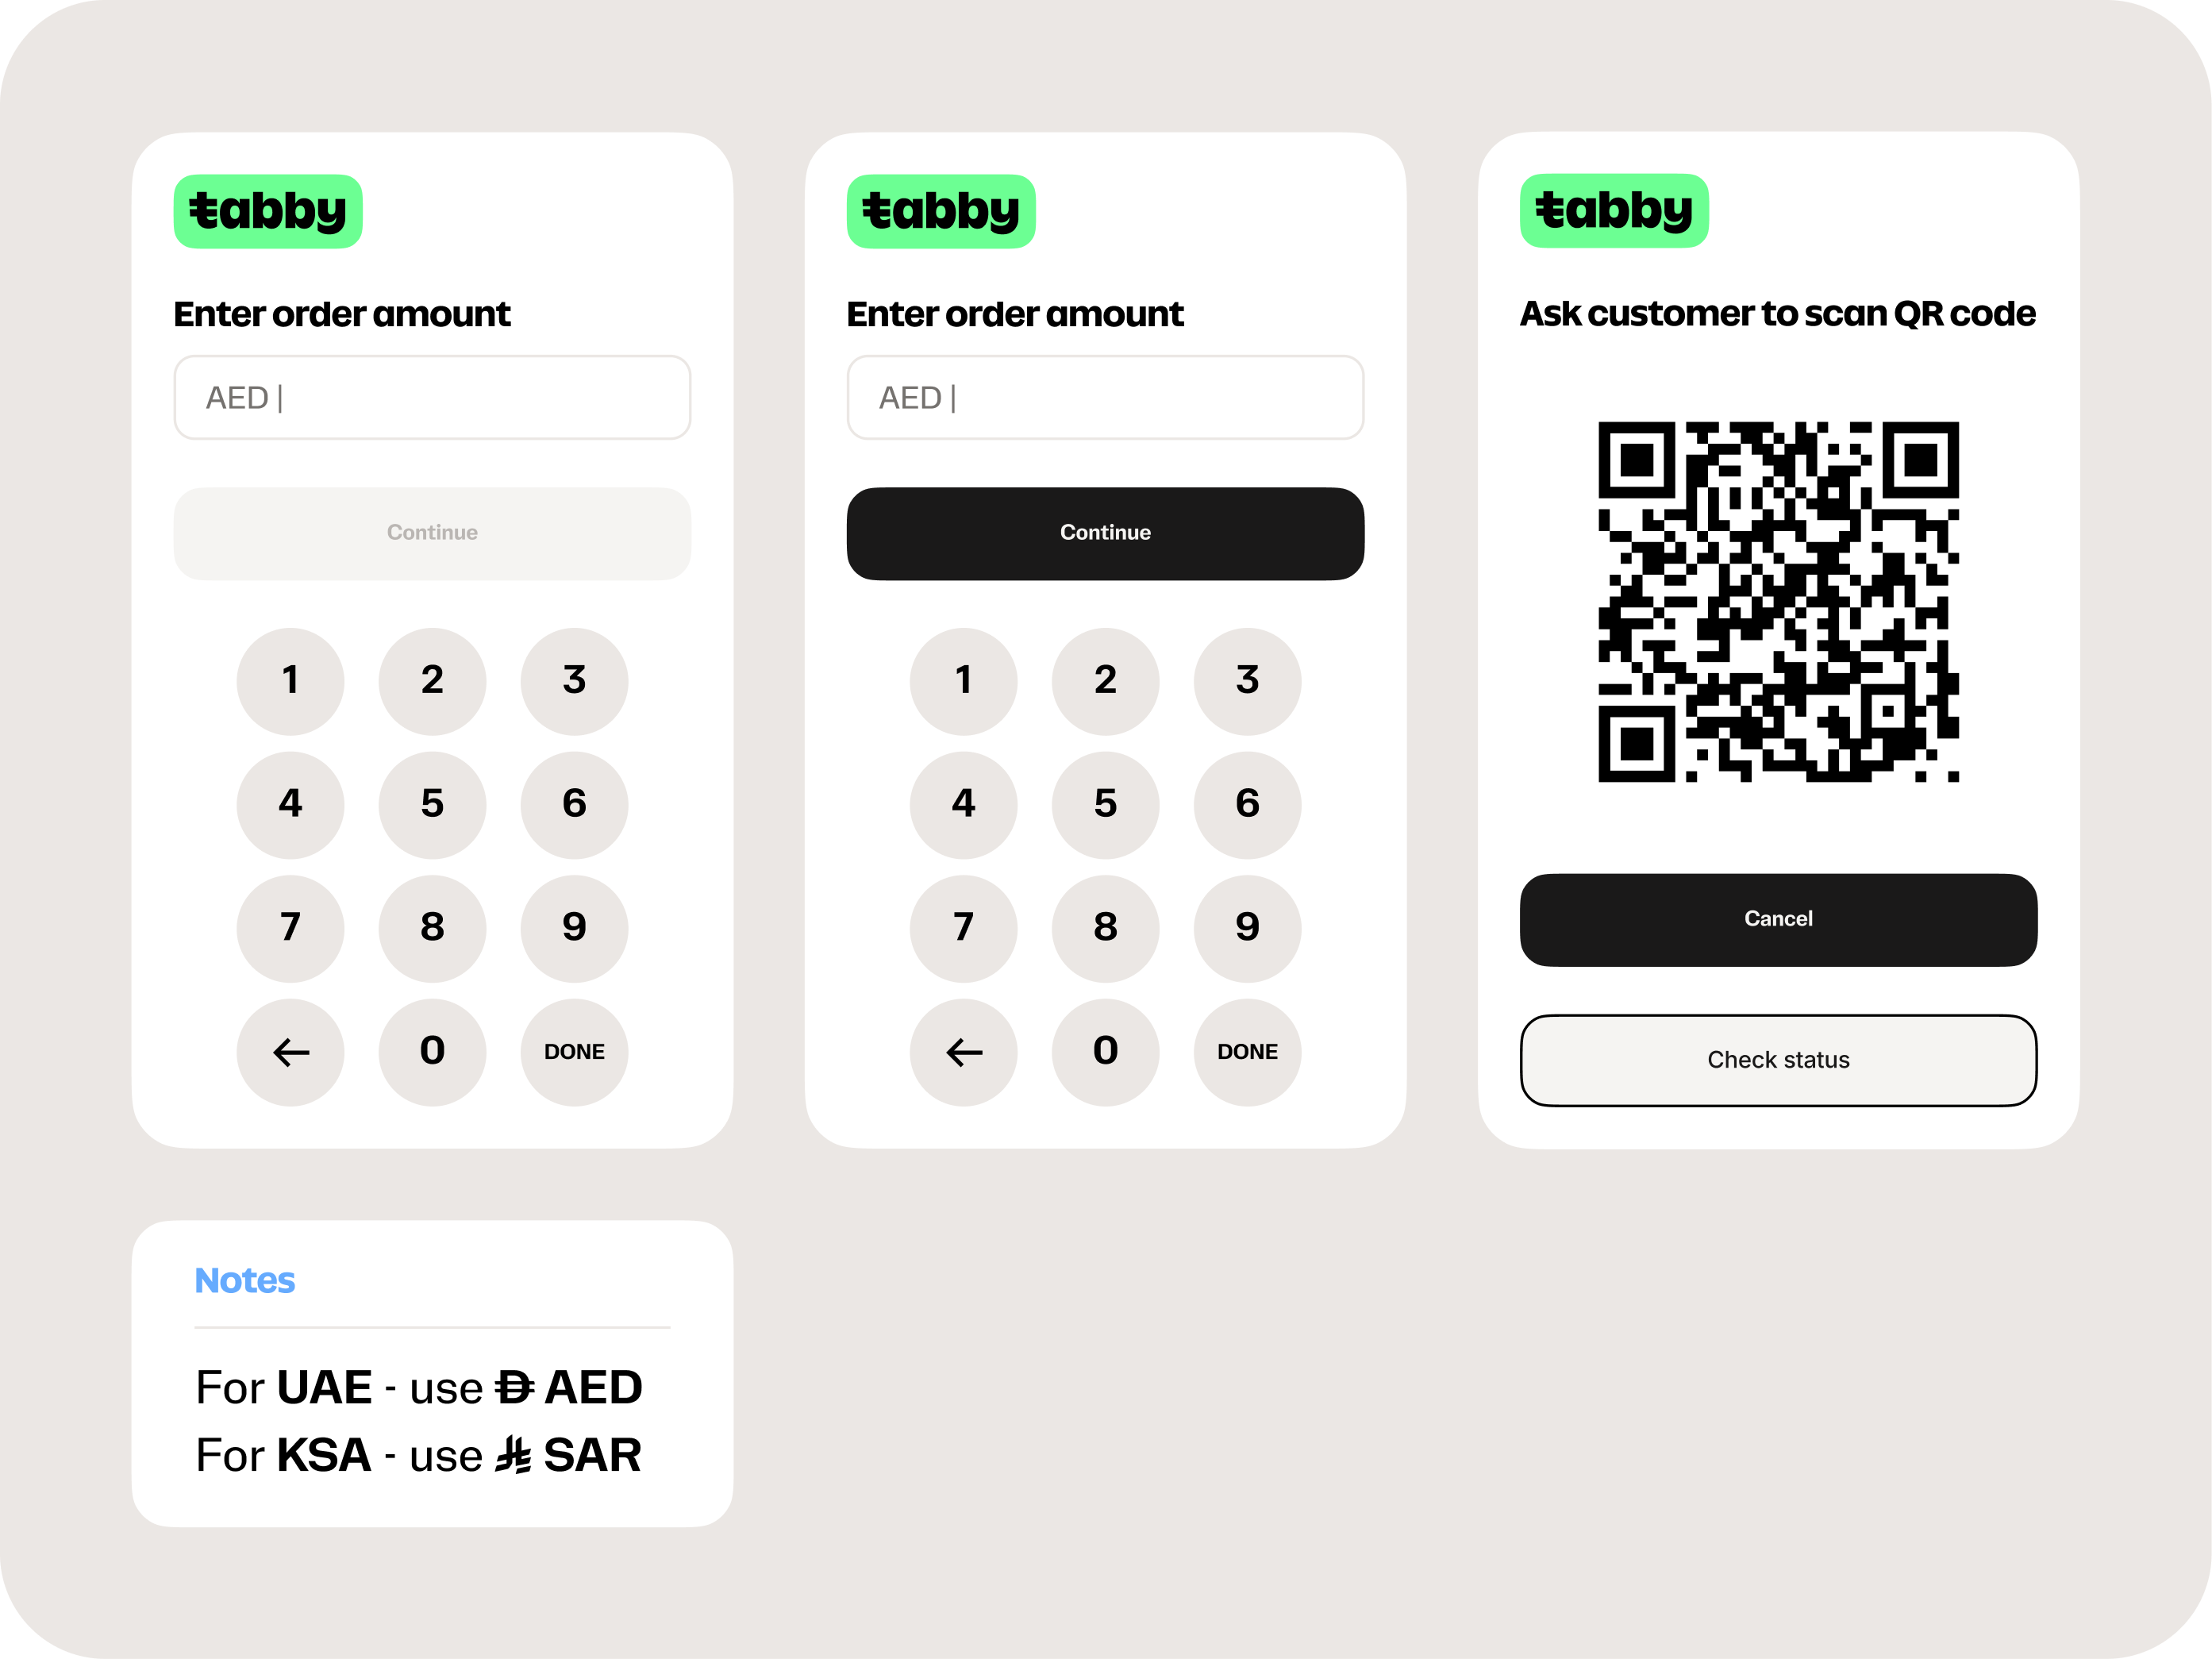
Native Screen POS Journey
Testing Scenarios
Kindly verify that your integration can handle all listed below scenarios.1. Payment Success
Testing Steps:- Choose Tabby on the POS terminal and enter the payment amount, press Enter.
- Show the QR code on the POS terminal for the customer to scan.
- On Tabby Checkout Page enter credentials:
- Complete the payment using
OTP:8888on Tabby Checkout page. - Verify that the successful status is received.
- Session creation response has status
“created”, and a QR code is shown successfully on the POS screen. - Tabby Checkout Page opens from the QR code.
- Credentials are entered.
- The success Tabby screen appears.
- Payment is successful and captured:
- on Merchant Dashboard payment status is
CAPTURED - via a Retrieve Payment API call response Payment status is
CLOSED, captured amount is present in the“captures”:[]array of objects.
- on Merchant Dashboard payment status is
2. Tabby Unavailable / API Error Handling
Testing Steps:- Choose Tabby on the POS terminal and enter a payment amount.
- Simulate one of the following failure scenarios on the Create a session API call:
- No response from Tabby - network timeout or loss of connectivity.
- Error response from Tabby - any
4xxor5xxstatus code. - Incomplete response - session is received but
configuration.available_products.installments[0].qr_codeandweb_urlare not present.
- Observe POS behavior while the terminal attempts to create the session and display a QR code.
- Select an alternative payment method on the POS terminal to complete the order.
- Tabby is present among payment methods on the POS terminal.
- Session creation does not complete successfully - the POS receives no response, an error status, or an incomplete payload.
- No QR code is shown; a failure screen or error message is displayed to the cashier, prompting to retry or select an alternative payment method. No payment is created in Tabby.
- The order can be completed via another payment method on the POS terminal.
3. Payment Cancellation
Testing Steps:- Choose Tabby on the POS terminal and enter the payment amount.
- Show the QR code on the POS terminal for the customer to scan.
- Click cancel (Cross icon) on Tabby Checkout page (you may also cancel the session from your POS terminal).
- Tabby is present among payment methods on POS terminal.
- Session creation response has status
“created”, and a QR code is shown successfully on the POS screen. - Tabby Checkout Page opens, a session is cancelled. On checking Payment Status via Retrieve Payment API call it should be
EXPIREDstatus. A new session can be created from POS terminal.
By default, Tabby session expires after 20 minutes since creation and customer is not able to continue the session. This session expiry timeout can be reduced by the request from the Merchant side to your assigned business manager in the Integrations thread.
4. Payment Failure
Testing Steps:- Choose Tabby on the POS terminal and enter the payment amount.
- Show the QR code on the POS terminal for the customer to scan.
- On Tabby Checkout Page enter credentials:
- Finish the payment using
OTP:8888on Tabby Checkout page. - Verify the payment status via Retrieve Payment API.
- Tabby is present among payment methods on POS terminal.
- Session creation response has status
“created”, and a QR code is shown successfully on the POS screen. - Tabby Checkout Page opens, credentials are entered.
- The rejection screen with the message ‘We can’t approve this purchase’ appears.
- On checking Payment Status via Retrieve Payment API call it should be
REJECTED.
Postman Collection
- Download the JSON file and import it into Postman.
- Set your
base_url,secret_key,merchant_code, andcurrencyin Collection Variables. See Base URLs for regional domains.
Payment Links / POS Collection
This API collection is used for both POS Integration and Custom Payment Links integration and includes all the POS steps.